The correct operation of the screed levelling is important while paving. Otherwise it can lead to an inconsistent laying thickness which affects the evenness of the paved road. The most important point is to give the screed enough time to react. Otherwise you a constantly chasing levels by operating the tow points or crank handles (used on US style pavers) Depending on the type of screed and paver it can take up to 3 tow arm lengths until you achieve100% of one change on the angle of attack through the tow point cylinder or crank handle. That means that you have to wait after you change the angle of attack until the screed settles at one thickness again. You often notice that people change the angle of attack every few meters, which means they are constantly chasing the levels instead of waiting for the 3 tow arms lengths before changing the angle again.
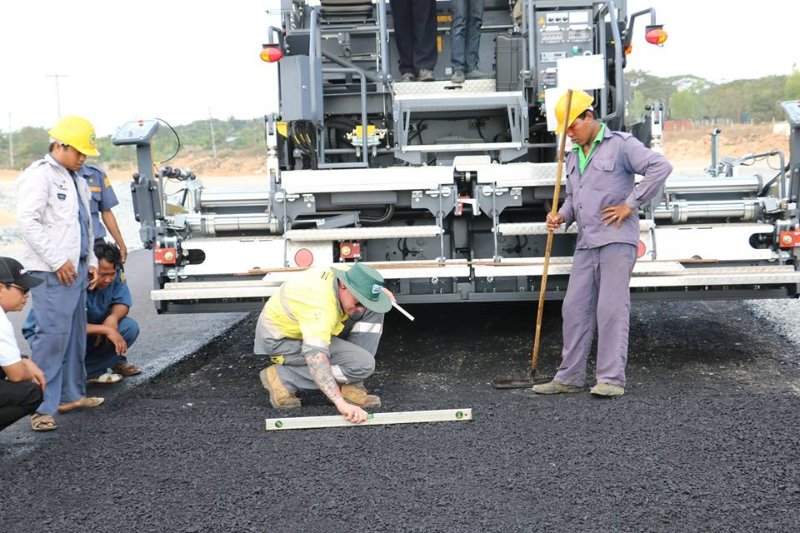
Another common mistake can happen when you only check your laying thickness in one spot. You can risk that you get a false measurement especially when you pave over a milled surface because you could measure in a low spot. I would recommend to always check the laying thickness in at least three different spots to get proper results.
The safest and easiest way to operate the screed is to use an automatic levelling. There are several different systems out in the market like mechanical sensors, ultrasonic non-contact sensors, laser systems, 3D levelling etc. which are able to control the screed levelling while the machine is paving but even here mistakes can easily happen.
One example is the slope sensor. Normally the sensor is calibrated by the supplier of the system or the machine but it always makes sense to check and calibrate the sensor if necessary before you start paving. There are different ways to perform this check.
Drive the paver on and even surface, move both tow points to zero (on US pavers with crank handle also set both handles to zero), lift the screed up, put screed lock mechanism in. Then place the screed on the pins. Put a digital straight edge underneath the rear part of the screed bottom plate and use the tow point up / down switch until the straight edge shows “zero”. Check the value of your slope sensor and match the value to “zero” as well. Now your slope sensor is calibrated!
Drive the paver over a defined area where you checked the cross slope before (concrete area, old asphalt layer etc) Then place the screed on the area that you checked. Make sure that you cleaned the area and that the screed sits on it properly. Then check your slope sensor value and match it to what you measured before. Now your slope sensor is calibrated!
Always double check the slope behind the screed after re-calibration!
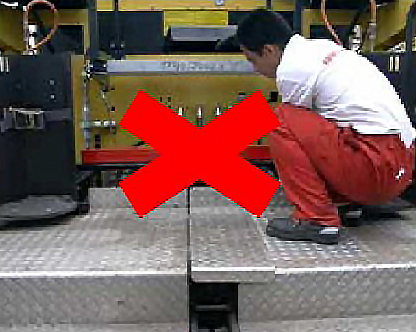 |
Some people also check the slope on the cross bar where the slope sensor mounts to but I wouldn´t recommend this. If the bar is not parallel (or bend) to the screed or due to mechanical tolerances the slope can be different to the actual slope of the screed. It is always the best and safest way to use the screed plate as reference! |
Another important point is the reference you use for levelling system such as string line, ground, curb stone etc. You can have the best system in the world but won´t achieve the best results if the reference is not correct. Here a few examples:
STRING LINE -
When you use a string line as reference you have to check the following things. Make sure that you use the correct diameter string line because it can affect the sensor reading for a start. Place the posts not too far apart from each other (max 7m) and keep the string line always tight. Make sure that the string line sits on the posts properly and that it is set high enough from the ground to avoid any interference.
GROUND -
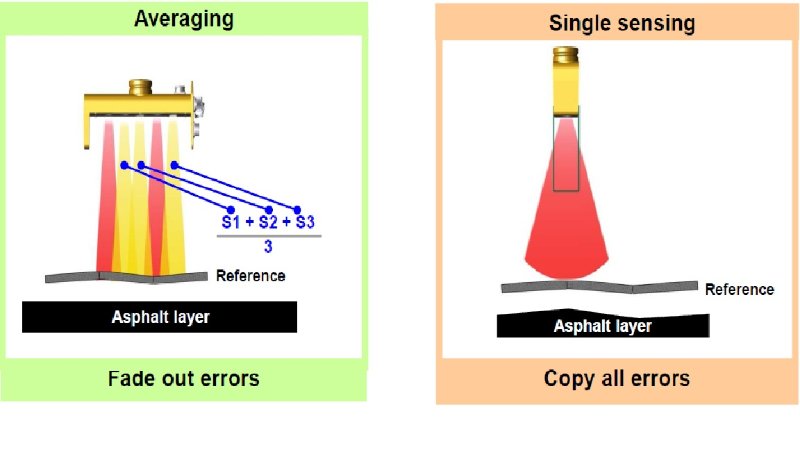
When you use the ground as a reference you have to make sure that it is prepared properly. Sensors can average unevenness over a certain area, depending on the sensor, but will start to copy once the unevenness is greater than the range of the sensor.
For example, you use a sensor with mechanical ski 500mm long, means that the sensor will average unevenness within 500mm but will start to copy unevenness above 500mm
There are also cases where you want to copy from an existing reference such as an old asphalt layer. In order to match this a good as possible you can change the sensivity setting in your levelling system menu to high or you move the position of your levelling sensor as close to the screed as possible (close to the screed = quick reaction time further away from the screed = slow reaction time
 Global / Inglês
 Espanha / Espanhol
 França / Francês
 Alemanha / Alemão
 Itália / Italiano
 Noruega / Norueguês
 Polska / Polski
 Suécia / Suéco
 China / Chinês
 Índia / Inglês
 EUA / Inglês
 Brasil / Português
 Rússia / Russo
 Austrália / Inglês